How to Create an Invoice
Introduction
Creating and sending your first invoice in InvoiceHela is simple. This guide walks you through the essential steps, from opening the invoice page to finalizing and sending it to your client.
Navigation Path
1
From your Dashboard, click on Invoices in the left sidebar.
2
Click the + icon to create a new invoice. You’ll be taken to the invoice page where you can enter all invoice details.
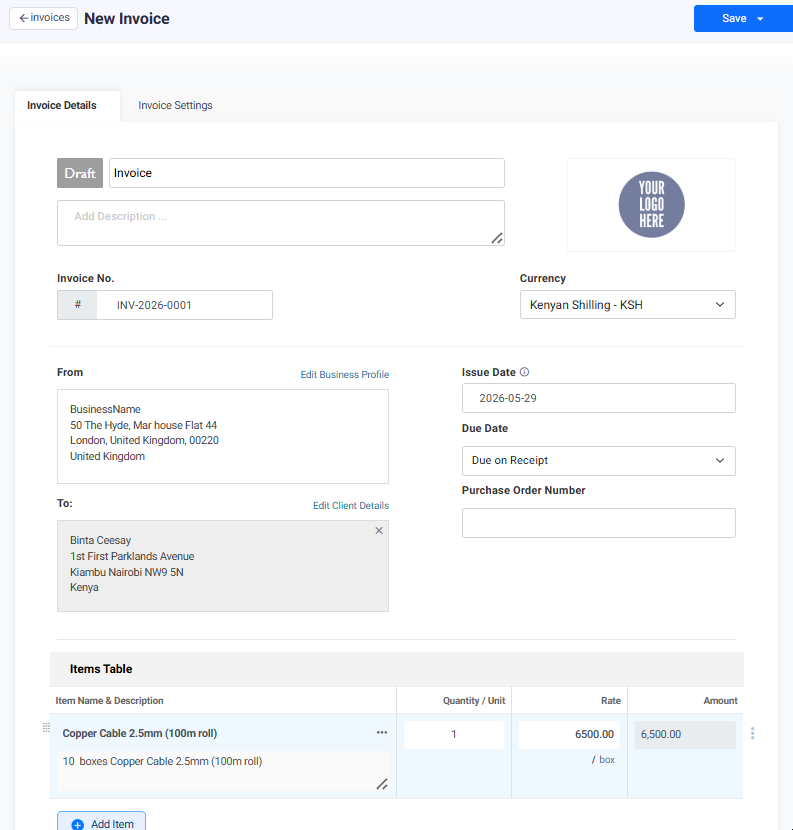
What to Include in Your Invoice
- Invoice Title & Number – A clear title (e.g., “Invoice”) and a unique invoice number.
- Issue Date & Due Date – Define when the invoice is issued and when payment is expected.
- Business Information – Your business name, logo, and contact details.
- Client Information – The recipient’s name, company, and address.
- Items Table – List products or services, including quantity, rate, and total amount.
- Currency – Select the currency for the transaction (e.g., KES, USD).
- Taxes, Discounts, Shipping – Add any applicable charges or reductions.
- Notes & Terms – Include payment instructions, thank-you notes, or terms and conditions.
Invoice Actions
Once your invoice is complete, use the action menu to decide how to proceed:
- Save Invoice – Saves the invoice in your account records without sending it yet.
- Save & Send Invoice – Saves and immediately sends the invoice to the client. If you’ve set up a payment account (e.g., M-Pesa), the client can pay directly, and the invoice will be automatically marked Paid with a receipt generated.
- Save as Draft – Keeps the invoice in draft mode so you can edit and finalize later.
- Cancel Invoice – Cancels the current invoice creation process and discards changes.
✅ You’re Ready
Your first invoice is now sent! Clients can pay directly, and you’ll have a professional record of the transaction inside InvoiceHela.